
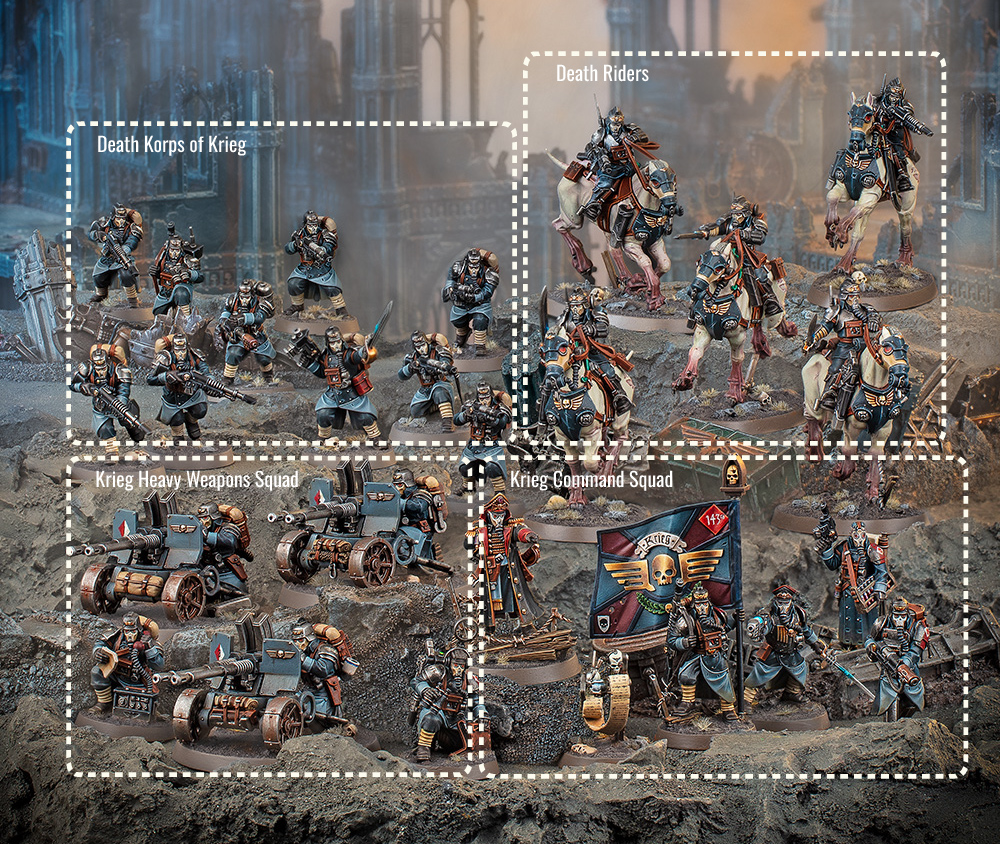
When Warhammer 40,000’s 11th edition launched in June 2026, Combat Patrol rules disappeared from the official app — and with them, the rules for many 10th edition combat patrols that had never been published in Warhammer Community as a standalone PDF. For boxes like this one, that meant losing access to the rules entirely unless you happened to have them saved somewhere else.
Fortunately, some of us kept an outdated copy of the app around, still holding the 10th edition Combat Patrol rules. This post collects those rules and datasheets for the Death Korps Combat Platoon so they don’t get lost to time, along with a few tactical tips for players picking up this box for the first time.
Unit list & playstyle
This Death Korps of Krieg combat patrol plays a defensive, attritional game with occasional bursts of aggression — true to the disciplined, expendable infantry theme of the Astra Militarum. This Combat Patrol does not seek to destroy the enemy on turn one, but rather to force them into making mistakes while you recycle your fallen units.
Krieg Command Squad
- 1 Lord Commissar (WARLORD)
- 5 Veteran Guardsmen
The Krieg Command Squad is primarily there to issue Orders that boost other units BS, Sv or M. The Lord Commissar can only issue 1 Order per turn (2 more if equipped with the Student of the Tactica enhancement), so prioritisation matters:
- Take Aim! is especially valuable on the Krieg Heavy Weapons Squad, whose heavy stubbers fire at BS 5+ — improving that to 4+ meaningfully boosts their damage output.
- Take Cover! helps offset the army’s general fragility (most models sit at Sv 5+).
- Move! Move! Move! can be decisive in getting the Death Riders into charge range.
Additionally, every turn the Lord Commissar lives, it gives you 1 extra CP to spend on stratagems. So every turn you have 2CP + 1 order to make combos.
Also the command squad has a meltagun (S9, AP-4, D6, Melta 2) and a plasma pistol (S8, AP-3, D2, Hazardous – supercharged), enabling it to put some trouble against armored units, specially if you attach them to the DKOK unit.
Death Korps of Krieg
- 1 Death Korps Watchmaster
- 9 Death Korps Troopers
Individually fragile — T3, Sv5+, 1 Wound — but compensates with numbers and mechanics that reward staying on the table. Grim Demeanour ability turns weakness into strength: the squad gains +1 to Hit rolls once below Starting Strength, and +1 to Wound rolls as well once Below Half-strength. Don’t be afraid to push this unit forward or use it as a screen — a battered squad often hits harder than a fresh one. This allows you to survive long enough to hold objectives and wear the opponent down, despite its weak damage output.
How to optimally play Grim Demeanour
View details
| Models alive | Bolt pistol | Lasgun | Flamer | Total |
|---|---|---|---|---|
| 10 | 0.25 | 2.67 | 1.75 | ≈4.67 |
| 9 | 0.33 | 3.11 | 1.75 | ≈5.19 |
| 4 | 0.56 | 1.67 | 2.33 | ≈4.56 |
The first casualty is the best one: it already unlocks the +1 to Hit bonus at almost no cost in volume, which is why 9 models produces more total damage than either 10 or 4. Pushing all the way down to 4 models also activates the +1 to Wound bonus, but by then you’ve lost more than half your shots, and that lost volume outweighs the extra reliability.
Remove lasgun Troopers first (keep the flamer and Watchmaster alive) when:
- The enemy is within 12″ (flamer range) or likely to close to that range soon — Torrent means guaranteed hits, and D6 shots matter more at short range than a handful of lasgun shots.
- You expect to face hordes or numerous units — the flamer doesn’t depend on the squad’s Ballistic Skill, so it keeps performing even as the unit is worn down.
- A charge (yours or theirs) looks likely — the Watchmaster’s power weapon (AP-2) is far better in melee than a Trooper’s close combat weapon.
- Your plan for the turn is to hold at short range rather than maximise ranged shots.
Remove the flamer/Watchmaster first (keep lasgun Troopers alive) when:
- The enemy is beyond 12″ and you won’t be closing the distance — the flamer contributes nothing that turn, making it dead weight you can afford to lose.
- You want to maximise total shots at 24″ range (lasgun range) against a distant target — total squad output depends much more on the number of living lasguns than on keeping the flamer.
- You don’t expect to enter melee this game or this turn — the power weapon loses its value if it never gets used.
- You’re prioritising the numerical resilience of the squad’s main body, since lasgun Troopers are individually replaceable but collectively your biggest source of ranged damage.
Practical summary: the flamer is the only weapon in the squad whose damage doesn’t scale with squad size — it always rolls D6 regardless of how mermada the unit is, which is why its relative value rises as the squad shrinks. In prolonged short-range fights, keeping it alive as long as possible maximises sustained damage; but if the enemy is far away or the fight is decided at range, it’s better to sacrifice it early and protect the lasgun volume, which is what actually performs in that scenario.
Krieg Heavy Weapons Squad
- 3 Heavy Weapons Gunners
- 1 Fire Coordinator
Rear fire-support. With its 48″ heavy stubbers and Final Duty ability, this squad works as a fire base best deployed early and left in place. As long as the Fire Coordinator survives, every destroyed Heavy Weapons Gunner has a 50% chance (3+) to give back some damage before being removed — so the squad can be positioned more aggressively than usual, since even “dying” models keep contributing shots. It’s the anchor of the list: it sets up in a strong position and punishes from range while the rest of the army manoeuvres.
Death Riders
- 1 Ridemaster
- 4 Death Riders
A reactive and mobile screen. The exception to the rest of the list: fast (M10″), armed with solid charge weapons (Frag lance, Power sabre), and able to reposition via Screening Line whenever an enemy unit ends a move near them, as long as they’re not engaged. They provide the list’s only real tactical flexibility beyond “hold and shoot” — flanking, threatening backfield objectives, or interrupting enemy charges.
Putting it all together
The Fresh Waves Stratagem brings back a destroyed Death Korps of Krieg or Death Riders unit at full Starting Strength. Knowing this safety net exists changes the risk calculation — those two units can be played more aggressively, even though the Stratagem costs 1CP and can only be used once the unit is already destroyed.
With several infantry units at OC 2, this list has solid board presence for its low cost — particularly relevant for the All Fronts Advance secondary, which rewards controlling objectives outside your own deployment zone.
This list suits players who enjoy:
- Playing the long game — resilient battles rather than alpha-strike lists.
- Carefully managing limited resources (CP, Orders) turn after turn.
- Accepting losses as part of the plan (thanks to Grim Demeanour and Fresh Waves) rather than playing ultra-conservatively.
- Using a single fast unit (Death Riders) as a tactical wildcard, rather than relying on army-wide mobility.
It’s a relatively beginner-friendly combat patrol, since it doesn’t demand complex multi-unit combos or elite synergy — the main challenge lies in managing Orders wisely and knowing when to trade infantry for time or position.
Army rule
Voice of Command
In your Command phase, OFFICER models from your army with this ability can issue Orders. Each OFFICER’s datasheet will specify how many Orders it can issue and which units are eligible to receive those Orders. Each time an OFFICER model issues an Order, select one of the Orders below, then select one eligible friendly unit within 6″ of that OFFICER model to issue it to.
Until the start of your next Command phase, the unit you selected is affected by that Order. Unless otherwise stated, a unit can only be affected by one Order at a time (any Order subsequently issued to that unit replaces the current one). If a unit being affected by an Order becomes Battle-shocked, that Order ceases to affect that unit.
Available orders
Move! Move! Move!
Add 3″ to the Move characteristic of models in this unit.
Take Aim!
Improve the Ballistic Skill characteristic of ranged weapons equipped by models in this unit by 1.
Take Cover!
Improve the Save characteristic of models in this unit by 1 (this cannot improve a model’s Save to better than 3+).
Enhancements
The Leader model must chose one of these two enchancements:
Student of the Tactica
In your Command phase, if the bearer is on the battlefield, you gain 1CP. In addition, the bearer can issue 2 additional Orders to REGIMENT units in your Command phase.
Intimidating Presence (Aura)
In your Command phase, if the bearer is on the battlefield, you gain 1CP. In addition, while a friendly REGIMENT unit is within 6″ of the bearer’s unit: Each time a model in this unit makes a ranged attack, re-roll a Hit roll of 1 and re-roll a Wound roll of 1.
Secondary objectives
One of these two must be chosen:
All Fronts Advance
At the end of each player’s turn, you score 5VP if you control one or more objective markers not within your deployment zone.
Hold and Repel
At the end of your opponent’s turn, you score 3VP if there are no enemy units wholly within your deployment zone (excluding Battle-shocked units). If there are no enemy units wholly within 6″ of your deployment zone (excluding Battle-shocked units), you score 5VP instead.
Which one should we choose?
In 4 of the 6 missions Combat Patrol missions (Clash of Patrols, Archeotech Recovery, Scorched Earth, Display of Might), the objective markers that matter for the primary objective are already located outside your deployment zone by mission design — so All Fronts Advance is the more consistent default pick for this combat patrol in most games, even more so than the general playstyle analysis alone would suggest.
Hold and Repel becomes a more specific, situational choice: it shines mainly when you’re playing the Defender role in missions that punish the opponent for pushing into your zone (Forward Outpost, Sweeping Raid), or against highly aggressive, fast-assault opponents in any mission, where denying your backfield matters more than contesting the centre.
Stratagems
Fresh Waves – 1CP
WHEN: Reinforcements step of your Movement phase.
TARGET: One destroyed DEATH KORPS OF KRIEG or DEATH RIDERS unit from your army. You can use this Stratagem on that unit even though it is destroyed.
EFFECT: Add a new unit to your army identical to your destroyed unit, at its original Starting Strength. Set that unit up anywhere on the battlefield wholly within 9″ of one or more battlefield edges and not within Engagement Range of one or more enemy units.
Fiendslayer Munitions – 1CP
WHEN: Your Shooting phase.
TARGET: Any number of ASTRA MILITARUM units from your army, and one enemy VEHICLE or MONSTER unit.
EFFECT: Until the end of the phase, each time a model in one of your selected units makes an attack that targets that enemy unit:
- Improve the Armour Penetration characteristics of Ranged weapons equipped by models in the selected units by 1.
- Ranged weapons equipped by models in the selected units have the [ANTI-VEHICLE 4+] and [ANTI-MONSTER 4+] abilities.
Smoke Barrage – 1CP
WHEN: Start of your opponent’s Charge phase.
TARGET: One ASTRA MILITARUM unit from your army.
EFFECT: Until the end of the phase, each time an enemy unit selects your unit as the target of a charge, subtract 2 from the Charge roll (this is not cumulative with any other negative modifiers to that Charge roll).
Datasheets
Krieg Command Squad
| Unit | M | T | SV | W | LD | OC | INSV |
|---|---|---|---|---|---|---|---|
| Lord Commissar | 6″ | 3 | 5+ | 3 | 6+ | 2 | – |
| Veteran Guardsman | 6″ | 3 | 5+ | 1 | 7+ | 2 | – |
Ranged weapons
| Weapon | Range | A | BS | S | AP | D | Abilities |
|---|---|---|---|---|---|---|---|
| Laspistol | 12″ | 1 | 4+ | 3 | 0 | 1 | Pistol |
| Plasma pistol – standard | 12″ | 1 | 4+ | 7 | -2 | 1 | Pistol |
| Plasma pistol – supercharge | 12″ | 1 | 4+ | 8 | -3 | 2 | HazardousPistol |
| Lasgun | 24″ | 1 | 4+ | 3 | 0 | 1 | Rapid Fire 1 |
| Meltagun | 12″ | 1 | 4+ | 9 | -4 | D6 | Melta 2 |
Melee weapons
| Weapon | Range | A | WS | S | AP | D | Abilities |
|---|---|---|---|---|---|---|---|
| Power weapon | Melee | 3 | 4+ | 4 | -2 | 1 | – |
| Close combat weapon | Melee | 2 | 4+ | 3 | 0 | 1 | – |
Unit composition
View details
- 1 Lord Commissar
- Equipped with: laspistol, power weapon.
- 5 Veteran Guardsmen
- 1x Veteran Guardsman equipped with: plasma pistol, power weapon.
- 1x Veteran Guardsman equipped with: lasgun, close combat weapon, master vox.
- 1x Veteran Guardsman equipped with: lasgun, close combat weapon.
- 1x Veteran Guardsman equipped with: meltagun, close combat weapon.
- 1x Veteran Guardsman equipped with: laspistol, close combat weapon, servo-scribes.
Abilities & special rules
Leader (Core): Attach this CHARACTER to one listed Bodyguard unit before battle. They act as one unit, use Bodyguard Toughness, and separate if Bodyguard destroyed.
Voice of Command (Faction): See Army Rule: Voice of Command.
Grim Determination (Unit): While this unit contains an OFFICER, you can target this unit with Stratagems even while it is Battle-shocked and Orders issued to this unit do not cease to affect this unit if it becomes Battle-shocked.
Orders (Unit): This unit’s OFFICER can issue 1 Order to a REGIMENT unit.
Leader (Unit): This unit can be attached to the following units: DEATH KORPS OF KRIEG.
Keywords
Infantry, Imperium, Platoon, Regiment, Krieg, Character, Officer, Astra Militarum
Death Korps of Krieg
| Unit | M | T | SV | W | LD | OC | INSV |
|---|---|---|---|---|---|---|---|
| Death Korps Watchmaster | 6″ | 3 | 5+ | 1 | 7+ | 2 | – |
| Death Korps Trooper | 6″ | 3 | 5+ | 1 | 7+ | 2 | – |
Ranged weapons
| Weapon | Range | A | BS | S | AP | D | Abilities |
|---|---|---|---|---|---|---|---|
| Bolt pistol | 12″ | 1 | 4+ | 4 | 0 | 1 | Pistol |
| Flamer | 12″ | D6 | – | 4 | 0 | 1 | Ignores CoverTorrent |
| Lasgun | 24″ | 1 | 4+ | 3 | 0 | 1 | Rapid Fire 1 |
Melee weapons
| Weapon | Range | A | WS | S | AP | D | Abilities |
|---|---|---|---|---|---|---|---|
| Power weapon | Melee | 2 | 4+ | 4 | -2 | 1 | – |
| Close combat weapon | Melee | 1 | 4+ | 3 | 0 | 1 | – |
Unit composition
View details
- 1 Death Korps Watchmaster
- Equipped with: bolt pistol, power weapon.
- 9 Death Korps Troopers
- 8x Death Korps Trooper equipped with: lasgun, close combat weapon.
- 1x Death Korps Trooper equipped with: flamer, close combat weapon.
Abilities & special rules
Grim Demeanour (Unit): Each time a model in this unit makes an attack, add 1 to the Hit roll if this unit is below its Starting Strength, and add 1 to the Wound roll as well if this unit is Below Half-strength.
Keywords
Infantry, Battleline, Imperium, Regiment, Platoon, Death Korps of Krieg, Astra Militarum
Krieg Heavy Weapons Squad
| Unit | M | T | SV | W | LD | OC | INSV |
|---|---|---|---|---|---|---|---|
| Heavy Weapons Gunner | 4″ | 3 | 4+ | 2 | 7+ | 1 | – |
| Fire Coordinator | 6″ | 3 | 5+ | 1 | 7+ | 1 | – |
Ranged weapons
| Weapon | Range | A | BS | S | AP | D | Abilities |
|---|---|---|---|---|---|---|---|
| Twin Krieg heavy stubber | 48″ | 3 | 5+ | 6 | -1 | 1 | HeavyRapid-fire 3Twin-linked |
| Laspistol | 12″ | 1 | 4+ | 3 | 0 | 1 | Pistol |
Melee weapons
| Weapon | Range | A | WS | S | AP | D | Abilities |
|---|---|---|---|---|---|---|---|
| Close combat weapon | Melee | 1 | 4+ | 3 | 0 | 1 | – |
Unit composition
View details
- 3 Heavy Weapons Gunners
- Equipped with: twin Krieg heavy stubber, laspistol, close combat weapon.
- 1 Fire Coordinator
- Equipped with: laspistol, close combat weapon.
Abilities & special rules
Final Duty (Unit): While this unit contains a Fire Coordinator, each time a Heavy Weapons Gunner model is destroyed, roll one D6: on a 3+, do not remove it from play. The destroyed model can shoot after the attacking model’s unit has finished making its attacks, and is then removed from play.
Keywords
Infantry, Imperium, Regiment, Krieg Heavy Weapons Squad, Astra Militarum
Death Riders
| Unit | M | T | SV | W | LD | OC | INSV |
|---|---|---|---|---|---|---|---|
| Ridemaster | 10″ | 4 | 4+ | 2 | 7+ | 1 | – |
| Death Rider | 10″ | 4 | 4+ | 2 | 7+ | 1 | – |
Ranged weapons
| Weapon | Range | A | BS | S | AP | D | Abilities |
|---|---|---|---|---|---|---|---|
| Death Rider lascarbine | 18″ | 2 | 4+ | 3 | 0 | 1 | Rapid Fire 3 |
Melee weapons
| Weapon | Range | A | WS | S | AP | D | Abilities |
|---|---|---|---|---|---|---|---|
| Frag lance | Melee | D6 | 3+ | 4 | 0 | 1 | Lance |
| Steed’s savage claws | Melee | 2 | 4+ | 4 | -1 | 1 | – |
| Power sabre | Melee | 3 | 3+ | 4 | -2 | 1 | – |
Unit composition
View details
- 1 Ridemaster
- Equipped with: Death Rider lascarbine, frag lance, power sabre, steed’s savage claws.
- 4 Death Riders
- Equipped with: Death Rider lascarbine, frag lance, power sabre, steed’s savage claws.
Abilities & special rules
Screening Line (Unit): Once per turn, when an enemy unit ends a Normal, Advance or Fall Back move within 9″ of this unit, if this unit is not within Engagement Range of one or more enemy units, it can make a Normal move of up to 6″.
Keywords
Mounted, Imperium, Regiment, Death Riders, Astra Militarum
Remarkable combos
Take Cover! (Order) + Go To Ground (Stratagem) — the stacked defensive combo
Take Cover! improves Save by 1 (capped at 3+); Go To Ground grants a 6+ invulnerable save and Benefit of Cover to a targeted INFANTRY unit. Applied to the Krieg Heavy Weapons Squad (Sv 4+ base): Take Cover! brings it to 3+, and if you also use Go To Ground when they’re shot at, you add Benefit of Cover (another +1 to Save) and a 6+ invulnerable floor. It’s the strongest defensive combination available for protecting your fire-support unit.
Student of the Tactica (Enhancement) + Voice of Command (Ability) — the Orders multiplier
With this enhancement, the Lord Commissar goes from 1 to 3 Orders per turn – meaning you can issue all three available Orders in the same Command phase: Move! Move! Move! to the Death Riders (more charge range), Take Aim! to the Heavy Weapons Squad (better shooting), and Take Cover! to the Death Korps of Krieg (more resilience while it holds an objective). This is the combo that multiplies the overall efficiency of the list the most in a single turn.
Intimidating Presence (Enhancement) + Take Aim! (Order) — freeing up the Order for another unit
If you take Intimidating Presence instead of Student of the Tactica, its aura already grants a re-roll of 1s on to-hit and to-wound rolls to REGIMENT units within 6″ of the bearer – if you keep the Lord Commissar near the Heavy Weapons Squad, you get shooting consistency without spending the Order on it, leaving your one available Order free for Move! Move! Move! on the Death Riders or Take Cover! on the infantry.
Fiendslayer Munitions (Stratagem) + Take Aim! (Order) — the anti-vehicle/monster combo
Fiendslayer Munitions improves AP by 1 and grants Anti-Vehicle 4+/Anti-Monster 4+ to the selected ranged weapons against a VEHICLE or MONSTER target. Combined with Take Aim! on the Heavy Weapons Squad (BS 4+), you turn a weapon designed for anti-infantry work (twin Krieg heavy stubber, S6 AP-1) into a reasonable one-off threat against tough targets – something this list otherwise lacks, since it has no dedicated anti-tank weapon besides the Command Squad’s meltagun.
Command Re-roll (Stratagem) + Move! Move! Move! (Order) — securing the Death Riders’ charge
Move! Move! Move! already adds 3″ to Movement, helping the Death Riders (M10″ base) reach charge range with more margin. If the charge roll still fails, Command Re-roll lets you re-roll it – the most direct way to maximise the reliability of the list’s only genuinely fast, aggressive element.
Screening Line (Ability) + Smoke Barrage (Stratagem) — the Death Riders’ deterrence bubble
Screening Line lets the Death Riders reposition up to 6″ once per turn whenever an enemy unit ends a move within 9″ of them, as long as they’re not engaged. Smoke Barrage subtracts 2 from the Charge roll of any enemy unit that targets an ASTRA MILITARUM unit of yours with a charge. Combined, you can use Screening Line to position the Death Riders as a blocking threat, and Smoke Barrage to make it nearly impossible for an enemy unit to successfully charge them – a very solid space-control combination for denying objectives or protecting a flank.
Heroic Intervention (Stratagem) + Death Riders (Unit) — the reactive counter-charge
Thanks to their M10″, the Death Riders have effective reach to intervene with Heroic Intervention (they must be within 6″ of the enemy unit that charged) in more situations than a standard infantry unit. With Frag lance (Lance ability, normally a charge bonus – though Heroic Intervention grants no Charge bonus, so you lose that extra) and Power sabre (AP-2), they can step in to rescue a threatened unit or avenge a charge with solid melee damage output.
Epic Challenge (Stratagem) + Lord Commissar (Unit) — sniping enemy characters
If the Lord Commissar (attached to the Command Squad via Leader) is fighting, Epic Challenge grants [PRECISION] to all his melee attacks that turn – letting you assign his Power weapon hits (S4 AP-2) directly against a CHARACTER within the enemy unit, instead of having them spread across the whole unit.
Grim Determination (Ability) + Insane Bravery (Stratagem) — double-layered command resilience
Grim Determination already protects the Command Squad from losing its Orders if it becomes Battle-shocked, and lets you target it with Stratagems in that state – but it doesn’t prevent the Battle-shock test itself (which drops its OC to 0, relevant for holding objectives). Insane Bravery does prevent the Battle-shock test entirely, once per battle: save it for the decisive turn when you need the Command Squad to keep its OC to secure a key objective (for example, turn 5 of All Fronts Advance or Hold and Repel).
Fresh Waves (Stratagem) + Grim Demeanour (Ability) — the trap to watch out for
Watch out for this combination working against you: Fresh Waves brings back a destroyed Death Korps of Krieg or Death Riders unit at its full Starting Strength – great for regaining board presence, but it resets the Grim Demeanour bonus, which depends on the unit being below its starting strength. It’s a genuine tactical decision: regain presence and OC vs. keep the combat bonus of an already worn-down unit.
